Shower Head Won'T Stop Leaking

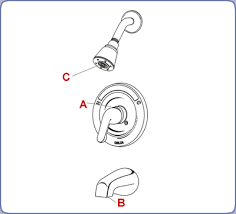
Repair a shower faucet that won't shut off. Most single-handle, cartridge-style faucets can be repaired in an hour or less with basic tools. Repair a shower faucet that won't shut off. Identifying a cartridge-style faucet In this article, we'll focus on fixing a cartridge-style faucet. Cartridge valves have a single handle and operate when the cartridge slides in and out. Don't confuse them with single-handle ball-style faucets, which have a dome-shaped casing under the handle. We won't deal with two-handle faucets here, which may be either a stem-type valve or ceramic disc valve. Turn off the water at the fixture shutoff valves or at your home's main valve. Turn on a faucet to make sure it's off. Remove the handle as shown in Photos 1 and 2. If the handle sticks, try heating it with a hair dryer set on “hot”. If you still can't get it off, use a special handle puller—an inexpensive tool available from plumbing parts distributors or home centers. Virtually every faucet manufacturer has a different method of securing the cartridge to the faucet body.

Look for a clip or spring and remove it (Photo 3). Cartridges are often difficult to pull out. Some manufacturers include a removal cap with new cartridges. Align the cap with the old cartridge ears and try to twist the cartridge loose. Then pull it out with pliers. If you can't budge the old cartridge, you'll need a cartridge puller. Make sure the one you buy works on your brand of faucet. Look on the handle or trim for the faucet brand or manufacturer. A knowledgeable person at a plumbing parts store may be able to identify the brand and model from a photo. Review Photos 4 and 5 for instructions on using a cartridge puller. Make sure you twist the cartridge loose before pulling it out (Photo 4). Take the old cartridge with you to a plumbing parts store or a home center to find an exact replacement. Install the new cartridge Turn the hex screw by hand until it bottoms out. Snug up the hex nut by hand and tug on the cartridge puller handle. If the cartridge won't pull out, hold the puller handle steady and tighten the hex nut two full turns.

Pull the cartridge out of the faucet body. Buy an identical replacement cartridge, align it properly and reassemble the parts.Your shower head has started leaking and dripping water, what is the easiest way to repair this? There could be a few different things wrong. We will start with the most likely problem that could be causing your showerhead to leak. We will show you why your shower head is leaking or not functioning properly when water is being supplied to it. If your shower head is leaking ALL THE TIME, then see the bottom of this page for ways to fix that specific issue.Lime deposits and hard water cause clogs and are a common reason a shower head will leak when water is being supplied to it. If the shower head water nozzles are clogged up from hard water deposits (Calcium and Lime) the water will be forced to come out somewhere else. Usually from the area where the shower head screws on to the water pipe coming out of the wall. If this is the case when you turn on the shower, then it needs a good cleaning.

With the water off, get a wrench and unscrew the shower head until it is removed.Carefully remove your showerhead with pliers by turning counter clockwise Get a glass bowl and fill it with vinegar.
Bully Pitbull Puppies For Sale In Maryland(Lime-Away and CLR work too)
Free Weight Loss StickersPut the shower head into the bowl and let soak for at least 2 hours.
Hot Tubs For Sale NorthwestVinegar is the safest to use when doing this. If you use CLR or Lime-Away it can strip the metal finish off of the shower head so use caution.To clean shower head use vinegar, CLR, or lime-away If your shower head is all plastic, then you can use any hard water remover without worry. Pour some of the lime-away or vinegar INTO the shower head also.

If the vinegar did not fully remove the lime and mineral deposits, then you can use a toothpick to remove the gunk in the shower nozzle holes if needed.Soak your shower head in the hard water cleaning solution for a few hoursWhile the shower head is soaking in the cleaning solution, add some fresh plumbers tape (white teflon tape) to the shower pipe fitting in the shower. This will help to make a “seal” so no water sprays out in this area. Once the shower head is clean (and after teflon tape is applied to the shower fixture arm) reinstall the shower head and test for leaks.Wrap the shower head water fixture arm with plumbers tape (teflon tape)Another reason for leakage is a worn or bad O-ring or rubber washer. To check to see if this is causing your problem, remove the shower head and look inside for the O-ring. If it looks cracked, ripped or distorted, you will need to get a new one at a plumbing or home improvement store. Replace the O-ring by inserting it into the shower head.You may need to replace the rubber o-ring in your shower head if it leaksOnce everything is clean and serviceable, put new teflon tape on the shower fixture arm and reinstall the shower head.
Once the shower head is reinstalled, do a test for leaks or dripping water. Make sure you tighten the showerhead onto the shower fixture arm tightly. If it is still leaking try tightening it more.Test the shower head once reinstalled for proper operationShower head before and after – lime deposits removedIf the shower head is leaking ALL the time, check the videos below on the easiest way to fix this yourself.The below videos will further assist with fixing your leaky shower head and a leaking shower faucet How to easily repair a leaking showerhead How to fix a leaky shower faucet How to fix a leaking bathtub faucetPlease Share Our Helpful DIY InformationThis guide will demonstrate the maintenance process of the shower head to prevent leaking at the connection between the shower head and the pipe. Time estimate: 10 - 15 minutes Water is leaking at the connection between the shower head and the pipe? Here are some simple steps to fix it! Use a ruler to measure about 8" long on the teflon tape.

Then use a pair of scissors to cut it. Place the wrench on the shower head mount. Adjust the wrench to fit tightly on the mount. For showerheads with shiny finishes, use a rag between the showerhead and the wrench to prevent scratching off the finish. Turn the wrench counter-clockwise to loosen the showerhead, then unscrew it the rest of the way by hand to remove it. Be careful not to have the shower head fall down and hit yourself when taking it down. Place and hold one end of the tape on the threads at the end of the shower arm (the pipe coming out of the wall). Teflon tape likes to stick to itself, so be careful not to let it fold over itself, or you'll be unfolding it all day. While taking care to keep the tape flat, wrap it clockwise around the threads, completely covering them and wrapping back over itself to stick. Be sure to wrap the tape clockwise, so that as you tighten the showerhead it won't unravel the tape. Thread the showerhead back onto the shower arm.