Led Light Strips On Ebay
Using LED’s as a light source is a no brainer! LED’s boast 40-50x’s the burn time, 1/10th the power usage and little to no heat emissions. Despite all these benefits LED’s can cost up to 30x’s more per bulb. In the long run LED’s pay for themselves but the initial investment can be substantial depending on the space you need to light. There are several options when it comes to installing LED’s into your RV: LED fixtures & light bars and bulbs. The Land Yacht had 6 existing light fixtures that use 18 small incandescent bulbs. We wanted to utilize these existing fixtures so we began looking into LED bulbs that are made for these 12v sockets. We quickly found that these 12v LED bulbs are not cheap! At almost $19 per bulb it would cost us over $340 to convert all our lights to LED. (Compare this to .60 per incandescent bulb!) So we began looking for different, cheaper, LED options… I had heard good things about LED lights from ebay. And at a fraction of the cost I decided to give them a try.

While much cheaper (around $5 per bulb) their brightness and color are not ideal and they do not come with any warranty.
Dj Laptop Stand ReviewsOnce the light diffuser is installed the ebay LED are pretty dim and the color is a cool blue and I much prefer a warmer hue.
Puma Safety Shoes Offers I’ve seen some very affordable 12v RV bulbs on AMAZON with good reviews.
Top Rated 35mm Digital CameraAt $11.95 for two its comparable to my ebay buy but look to be a warmer hue and better quality. When looking for 12v bulbs be sure to know what type of socket you need as there is a handful of options out there. The easiest way to get LED’s into your space is simply adding LED bulbs to your existing fixtures. At a trip to IKEA I found these under the counter LED lights called DIODER.

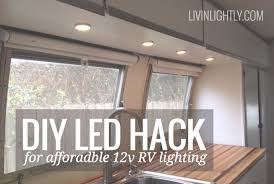
For $29 the kit came with 4 little LED fixtures (9 LED’s per fixtures), mounting hardware, wire and switch. As with most appliances the DIODER had a transformer that converts the AC current to DC. Since travel trailers are made to run on 12v this meant I could hack off the transformer and wire the LED lights directly into the trailers 12v system. All the trailer lights run on 12v DC power – even while connected to AC shore power. The AC power goes to a power converter that transforms the AC current to DC to run lights, water pump and maintain a charge on your battery. Since we plan to be primarily off-grid without AC power hookups keeping everything on a 12v system makes the most sense. Installing the LED’s is pretty simple. Select the place you want them installed (we installed them under all our cabinets), cut off the AC transformer then wire them into the trailer 12v power. Our trailer had 12v power lines run to all the different parts of the trailer we wanted to install the lights.

(These 12v power lines were feeding other lights, range vent fan and the heater thermostat.) In our trailer some of the 12v power lines are white wire and others are black. This was a bit confusing because all the AC power lines are white. So I used a power meter to test the lines to verify they were 12v DC. For our trailer black was positive and white was negative. If you’re not sure whether the wire you are dealing with is AC or DC start with the AC setting on your meter…if the reading is a decimal and jumps around then you’re probably dealing with DC power. You should get a reading of between 12-13.5v DC. On the actual lights you will need to determine which wire is positive and which is negative. (Note: THIS IS VERY IMPORTANT! DO NOT use trial and error to find the positive and negative…this WILL fry your LED!) The IKEA DIODER wire has writing on the positive wire. If you want to double check this you can take apart the transformer and on the output side of the circuit board it will say 12v+ & GND. Follow 12v+ wire into the junction box then you can see which wire is positive that plugs into the box.

On all of my lights positive was the wire with writing on it. You can either install the lights with an adhesive pad or screws (both included). The LED twist counter clockwise from the silver mounting brackets. To install with screws drill a hole for your wire, screw down the silver mounting bracket then twist in the LED. For a simple, temporary solution, you can use the switch that comes with the light kit. Hack off both ends and strip the wire. Using wire nuts connect the negative and positive to one end of the switch. Use your power meter to verify the +/- wires when you turn the switch on. (These wires should be in-line and the same on the other end of the switch.) Once you have determined the +/- sides connect the corresponding wires from the lights. Eventually I will install 12v switches permanently recessed underneath each cabinet. I will also solder and heat shrink all the wire joints for a more permanent installation. The IKEA LED’s give us area specific bright warm light that only uses 5w per 4 fixtures and cost a fraction of other LED options at $7.50 per light.

(As opposed to $19 per light) These little fixtures are great accent lighting and a cheap way to get 12v LED into your RV! LED Bulbs for Existing Fixtures More LED’s for Existing Fixtures POWER: DIY Portable Solar System HEAT: Small Wood Burning Stoves COOLING: Off-Grid Cooling & Air ConditioningView: All Items | Buy It Now GalleryPrice + Postage: lowest first Posting to AUSEnlargeL-Shaped LED Strip Mono Connector Single ColorEnlargeBattery Holder Pack 4 AA 6V with DC ConnectorEnlargeSingle Color Mini Dimmer Controller for LED Light Stri...Enlarge1 to 2 DC Splitter LED Light Strip or BarEnlarge1 to 4 DC Splitter LED Light Strip or BarEnlargeBattery Holder Pack 8 AA 12V with DC ConnectorEnlarge2 PIN Waterproof Extension Connector Wire Cable Cord Fo...EnlargeDisplay, Furniture, Indoor LED LIGHT STRIP 3528 WhiteEnlarge2 x Single Color Mini Dimmer Controller for LED Light ...Enlarge4 x L-Shaped LED Strip Mono Connector Single ColorEnlarge4 x L-Shaped LED Connector for RGB LED Light StripEnlarge5 x LED Strip Connectors Bidirectional 10 mm 2 Pins + 2...Enlarge5 x LED Strip Connectors Bidirectional 10 mm 2 Pins + 2...EnlargeLED Light Electronic Project Educational DIY KIT with B...