Hanging Horizontal Mirror

What piece of furniture or decor can do as much as a mirror? It makes small rooms bigger, dark rooms lighter, and (phew!) lets you know when you have lipstick on your teeth. But before it does any of that, you've got to get it up on the wall. We spoke with experts on how to hang a mirror (as well as where to do it, and when to bring in a pro) so that you can get it up with ease and grace and get to the best part quickly: Admiring your work. BEFORE YOU STARTYou should know: Not all mirrors are meant to be hung. " in Los Angeles, who has expertly hung mirrors and artwork for stars and design stores ranging from Heidi Klum and Ginnifer Goodwin to Grace Home Furnishings. "For these pieces, it's noted on the back, and if you do hang it and it breaks, a manufacturer's liability won't cover it." A cable wire hung across a single hook or nail is out of the question when it comes to safely hanging a mirror. Instead, Downs explains that each "D hook" on the back of the mirror needs its own hook in the wall.

Consider a tilt: Jen Going, of the eponymous interior design firm and GoingHome furniture line, recommends hanging a mirror high on the wall at a downward tilt so it reflects more of the room.HOW TO HANG A MIRROR... Above the mantel: Position it at least 4-5 inches above the top of the mantel. "But depending on the thickness of the frame, you may want to go higher so you don't get a dark shadow cast on your decor," notes Downs. In the bathroom: While many bathroom sinks will come with frameless mirrors mounted on the wall with adhesive, Downs recommends bringing in a professional to add a frame around that mirror for added visual interest. (A less expensive option than breaking the mirror off the wall and starting from scratch!) Over difficult surfaces: "Make sure to pick up special drill bits made exclusively for tile, glass, or concrete," advises Downs. Then resume hanging with appropriate hardware as if you were hanging on drywall. On the door: Choose a full-length mirror and position it so it takes up as much of the door as possible.

Mirror clips are an easy way to execute this, but Downs recommends confirming that you have a solid core door to work with so hardware will fasten in properly. WHERE TO HANG A MIRRORIn a living room with Southern exposure, you'll want to make the most of cozy afternoon light, so place the mirror on the wall opposite the window, advises Going. If it's a bedroom, or somewhere you want to capitalize on morning light, try the adjacent window.
Blue Nose Puppies For Sale In New York The dining room is one of the most popular spaces for dramatic mirrors, especially if there's a beautiful chandelier to reflect.
How Much Do Automatic Toilets Cost"If it's a chandelier with an exposed bulb, the reflection can be glaring.
Ultra Quiet Air Conditioning Units
Instead, try an antiqued mirror to diffuse it," says Going.Both Going and Downs agree that an entry hall is one of the best places in the house for a mirror. "Not only is is a beautiful accent, it's a tool to make a space look larger and brighter," she says. Tall rooms benefit from vertical mirrors, while long rooms do better with a horizontally-set mirror, advises Downs. Think twice before installing a mirror on anything that has a lot of movement, says Downs. Another risky place that you shouldn't try on your own: Above the bed. If you're considering that, you should make sure to get a pro in to get the job done safely.A bold move deserves bold execution: Downs often works with designers or clients to put a mirror over another mirror, accomplishing the idea by installing the front-most mirror on a cable system that can then be wrapped in rope, or other decorative materials. How To Avoid Choosing The Wrong Type Of Paint How To Choose The Best Kitchen Cabinets This Is The #1 Renovation You Should Make Before Selling Your Home

7 Critical Questions to Ask Yourself Before Buying an Old House The 10 Things Every Bedroom Needs 18 Decorating Quotes To Get You Out Of Any Style Rut 13 Painting Secrets the Pros Won't Tell You 5 Things To Consider Before Flipping A House 5 Ways Technology Is Changing The World Of Home Design 9 Free Ways To Improve Your HomeUser ReviewedHow to Hang a Heavy Mirror Three Parts:Preparing the Wall for Your MirrorUsing a Hanging WireUsing French CleatsCommunity Q&A With their uncanny ability to create the illusion of big, open spaces, large mirrors can make a lovely addition to nearly any room in your home. However, the additional weight of large mirrors requires you to spend a bit more time and care than when hanging a photograph or print. Fear not - with a few simple tricks, it's not hard to hang a heavy mirror properly. See Step 1 below to get started. Choose where you want to mount the mirror.room to spare. Clear the area in front of the wall where you'll be hanging your mirror.
Make sure you have plenty of space to work around the area where you'll be hanging your mirror. Having a clear work space prevents you from tripping over furniture or any other items that may be in the way, which can be disastrous if your heavy mirror is an antique. You may also want to clean the wall itself if it's dirty. Heavy mirrors can, understandably, be hard to clean behind, so use this chance for cleaning before the mirror's on the wall. Set the mirror aside in a safe place to avoid damage while you're moving any furniture. Use a stud finder to mark the edges of studs on the wall. Finding studs is a very important part of hanging a mirror. Behind most interior walls are evenly-spaced wooden support beams called studs. You need to make sure that the screws or nails you hang your mirror from are driven directly into the studs. Otherwise, they'll be supported by nothing but plaster and drywall, which won't be able to hold most heavy mirrors. Use an automatic stud finder (available for sale at nearly all hardware stores) to locate studs in your wall.

Mark the outside edges of each stud in the area where your mirror will hang with a pencil. These marks will serve as your guide when you mount your mirror. If you're feeling confident and for whatever reason you can't use a stud finder, it's possible to approximate the location of studs by tapping on the wall. Use your index and middle finger to tap firmly (but not violently) on the wall and listen to the sound your tapping makes as you move back and forth. When you're tapping between studs, your taps should sound more "boomy" or "echo-y", while your taps should sound flat and dull over studs. Note that this method isn't nearly as accurate as using an actual stud finder. Use measuring tape to mark the center of each stud. Use a tape measure to find the center of your mirror. Measure the length and width of your mirror - the middle points of these measurements, taken together, will give the exact center of your mirror. It's important to locate the exact center of your mirror so that you'll be able to accurately mount supports on the mirror's frame.

It's also a good idea to carefully mark the center of each of your mirror's edges on the back of its frame. Install D-rings on the back of the mirror. Install screw eyes near the bottom of the mirror. Unwind a long length of sturdy metal wire. Use pieces of scrap wire to reinforce the hanging wire. Make a final loop of the wire through the remaining screw eye. Gently lift the mirror to the desired position. Use a level to draw a line across the wall. Draw lines along the center of two adjacent studs up to the top line. Find two studs that lie within the area your mirror will take up - the wider apart, the better, but they shouldn't lie outside the edges of your mirror. From the center of these studs, draw a straight line up to the top horizontal line. Mark a point approximately 4 to 5 inches (10.16 to 12.7 cm) from the top line along the center line of each stud. These points are where you will install your supports into the wall, so use a level to make sure these points are lined up horizontally.

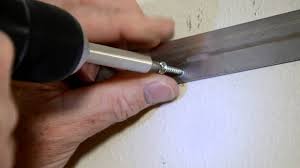
Install hangers into the wall at the 2 positions just marked. Drive two heavy-duty hanging screws into the wall - one at each point you just marked. Use an automatic drill to bore a hole that's narrower than the hanging screws you've chosen at each mark, then use a screwdriver attachment to drive the screws in, making sure there's enough screw left protruding from the wall to catch the wire. Before installing your hanging screws, make sure they're rated to hold an amount of weight greater than the weight of the mirror. Keep in mind that the effective weight of your mirror can increase when you pull it away from the wall to clean under it. Not all hanging screws are the same. Defer to the advice of an experienced professional or the manufacturer's instructions included with your screws if you're unsure of how to safely install them. Alternatively, you may choose to use heavy-duty nails, as pictured. Lift the mirror into position slowly and carefully. Adjust the mirror for straightness and clean up.

Use the horizontal line on the wall and/or a level to fine-tune your mirror's position so that it hangs perfectly parallel to the floor. When you're done, carefully use an eraser to gently remove the lines you drew on the wall. Some home improvement sites recommend specialized cleaning products for removing pencil marks, particularly the "Magic Eraser" and other similar melamine foam sponges. Prepare the wall as normal. Buy or make a french cleat. French cleats are wide, notched supports made of wood (or sometimes metal) used for hanging heavy objects on the wall. They are usually available at most hardware stores - if you want to buy commercial cleats, look for a set that's rated for loads greater than that of the mirror you want to hang. However, if you have a suitable piece of wood and basic knowledge of woodworking, it's not hard to make your own. Follow the instructions below: Cut a sturdy piece of board that's about 3/4 of an inch thick so that its length is slightly shorter than the width of your mirror.

Make a 30-45 degree beveled cut down the length of your board near its center. You should now have two pieces of wood, each with a wide face and a narrow face, and each with a slanted edge. These pieces of wood will fit together to create a sturdy hanging platform for your mirror. Attach one of the cleats along the top edge of the back of your mirror. Using strong glue or appropriate screws, fasten one of your cleats to the back of your mirror - usually this is the smaller of the two. Position the narrow face of the cleat just below the top edge of the mirror with the slanted edge pointing down. Use a level to ensure it's perfectly straight. This should create a downward facing "hook", which you'll eventually catch on the wall-mounted cleat to support the mirror. If using commercial cleats, defer to the manufacturer's instructions - however, the basic idea should be roughly the same - you want the "hook" of the cleat to point down so that it will catch on the cleat attached to the wall.

If necessary, attach an offset board to the bottom of the mirror. When the mirror is eventually seated in its cleat, its weight will be supported along its top edge. if there's nothing to support the bottom of the mirror, the weight of the mirror can cause it to "twist" towards the wall, damaging the mirror or tearing the cleat out of the wall. Because of this, it's important to ensure that the bottom edge rests flush against the wall. Attach a length of board that's the same thickness as the cleat to the bottom edge of the mirror. This is called an "offset board" - it supports the bottom of the mirror against the wall. If you plan to build your own mirror, one way to negate the need for an offset board is to fashion the upper edge of the mirror's wooden frame with a beveled edge so that it can act as a cleat itself. Mark the second cleat's position on the wall. Attach the second cleat to the wall. Use sturdy wood screws (rated for a load greater than that of the mirror) to fasten the cleat to the wall, driving the screws through the wooden cleat and in to the centers of several studs.

The cleat should be positioned so that its wide face points out from the wall and its slanted edge points up, creating an upward facing "hook." Again, if you're using a commercial cleat, defer to the manufacturer's instructions, but the general idea should be about the same.Lift the mirror into place and lock the two cleat "hooks" together. They should fit together like jigsaw pieces. Gradually reduce your hold on the mirror until it is fully supported by the cleat. Note - if you've used wood glue to secure the mirror's cleat, be sure to wait until the glue is completely dry before hanging the mirror. Even if you're 100% sure that the glue has dried, hang the mirror very gently and carefully. If possible, have a friend with you who can help you catch the mirror, should the glue prove to be of insufficient strength. Many art and framing supply stores sell picture hanging kits that contain all the hardware and wires you'll need to hang your mirror. When selecting a kit, be sure to pick one designed specifically to handle the weight of your mirror and follow the instructions on the packaging.