Diy Pvc Pool Towel Rack

How to Build a PVC Pool Towel Rack Every pool owner has towels -- lots of towels. And during the warmer months they seem to multiply. To solve the towel-drying problem once and for all, build this handy towel rack from ordinary PVC plumber's pipe. The rack can hold eight full-size beach towels, and, as a bonus, it corrals all the pool noodles and floaties. You can also watch a video tutorial here. Collect the supplies needed, which you can find at any home improvement store. You will also need a hacksaw or a miter saw. Cut the PVC into the following lengths: Remove any cutting burrs and the printing on the side of the PVC tubing using 100-grit sandpaper. A couple of quick swipes with the sandpaper should work. Follow up with a few strokes with the 220-grit sandpaper to remove any scratches. Dry fit the towel bars by laying eight sections of 38-inch PVC on a flat surface and placing a T-connector on each end. Make sure the connectors are set at a 90-degree alignment.

These T sections will form the towel bars for the rack. Assemble the rack by connecting the T-section towel bars that you assembled in Step 4 in the following order on each end: T section, 2-inch piece, 45-degree elbow, 4-inch piece, T section, 4-inch piece, T section, 4-inch piece, 45-degree elbow, 2-inch piece, T section, 4-inch piece, T section, 2-inch piece, 45-degree elbow, 4-inch piece, T section, 4-inch piece, T section, 4-inch piece, 45-degree elbow, 2-inch piece, T section.
Used Patio Furniture Dallas Tx Assemble the base by forming a square with the three-way connectors and four pieces of 38-inch PVC.
3/4 Sleeve T Shirt MalaysiaPut the legs in place by inserting the 30-inch pieces of PVC vertically in each of the four connectors.
Art Deco Mirror With Chain
Set the rack section on top of the base section and check all connections for accurate alignment. Remove the rack section from the base section, when you are satisfied with the fit. Starting with the base section, remove each joint one at a time, and apply a quick swipe of primer, followed immediately with a swipe of the glue. It is sufficient to prime and glue either the inside of the connector or the outside of the tube; it is not necessary to do both. Be sure the alignment is correct before setting the pieces back together because the glue sets almost instantly. Continue until you have glued all the joints in the base section. Repeat the procedure for the rack section and then prime and glue the two sections together, completing the towel rack. 19 Home Decor DIYs That Only Look Expensive How to Make a Towel Rack Out of PVC How to Build a Pool Cover From PVC Pipe How to Build a Towel Rack PVC Pipe How to Make a Towel Poncho How to Make a Drying Rack for a RV Ladder

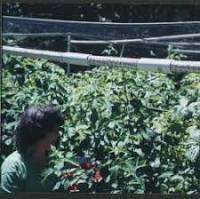
How to Build a Bike Rack for a Pickup TruckOur back yard, while not large, is mostly pool: We have a 45' x 15' "play" salt water pool with a giant-ass fake rock waterfall and beautiful travertine tile pool decking. It's awesome and since we live in Arizona, we use it a lot.That means plenty of towels. That also used to mean towels draped all over the place. Check out the DIY PVC poolside towel tree: Our new swanky poolside towel tree rack thing Executive SummaryThe stand is a $32 back yard weighted shade umbrella stand. The stem is 1-1/2" PVC pipe cut to 6'. That was maybe $10-ish. The arms are four 24" long 1/2" PVC pipes centered through holes that are 6" apart down the stem, each rotated 45º from each other. The stem and the arms have caps on them glued with regular blue PVC cement. The arms are screwed in place with some screws I had in my parts drawers. I sprayed Valspar® clear plastic primer on everything (except the base) to make sure the top coat of paint stuck well.

I sprayed Rustoleum® "Hammered Metal" texture paint in a bronze-ish color for a cool, metal kinda finish to match the stuff on our back patio.Stuff to Get or HaveEverything you need for this thing can be picked up at a single store. I got all of my stuff for this build at the Lowe's® right down the street from our house. Here's the list (prices from memory or gut, since I accidentally tossed the receipt): Weighted umbrella stand and 24" long 1/2" schedule 40 PVC pipes One weighted shade umbrella stand (about $32)One 10' piece of 1-1/2" schedule 40 PVC ($11)NOTE: Make sure the pipe you purchase for the stem fits inside the post holder part of the umbrella stand. Different brands may have different inner diameters for their holders, so, you know, use your head.One 1-1/2" schedule 40 PVC cap ($1)Four 24" pieces of 1/2" schedule 40 PVC ($1.43 ea, pre-cut)Eight 1/2" schedule 40 PVC caps (35¢ ea)Blue PVC glue (I use Weld-On®) (small can ~ $10)Four 1" screws (pennies, maybe laying around in your garage)One can of plastic primer (I used Valspar®) ($6)Finish paint (I used Rustoleum® Universal Hammered) ($6)

10-foot long, 1-1/2" schedule 40 PVC pipe Primer, paint and PVC end caps As for tools, you mileage may vary... I used these tools:Saw to cut 10' pipe to 6'Drill or drill pressScrewdriverRuler or tape measureImprovised tools I made for this project because I'm a perfectionist-kinda-sorta:Pipe-holding jig to keep pipe from rolling in drill pressPaper template for 45º markings to make sure arms are perfectly rotated relative to each otherHow I Made ItThis might be one of the simplest builds on this site. Four 7/8" drill holes completely through the big pipe and four little drill holes for the four screws. Primer, paint and boom-done.The StemThe only cutting you need to do in this project is the 1-1/2" PVC pipe. They come in 10' lengths at the hardware store, although you might be able to get them to cut it for you. Either way, it's easy. Grab a saw (table saw, band saw, hack saw, chop saw, whatever) and make that bad boy 6' or 5'. We liked 6' because our pool towels are quite long and we didn't want them hanging too close to the ground.
Pipe drilling jig made from scrap MDF The tricky part of the stem is the silly holes through which you will put the arms. I used a 7/8" Forstner bit (a set like mine on Amazon is about $50-ish) to drill the holes THROUGH the 1-1/2" pipe. You can do this with a hand drill, but it's WAY easier (IMHO) to use a drill press and a jig (see above). Another view of scrap MDF pipe holder for drill press I grabbed some scrap MDF and a few nails to make this little doohickey. Take a wide enough piece, put the pipe on it. Place two smaller pieces of MDF on either side of the pipe and snug them up to it without lifting the pipe off the base piece. Also, in my case, the shortest nails I had were longer than the thickness of a piece of MDF, so I doubled up the base pieces. Nail the first layer of side pieces to the base. Leaving the pipe in place, put two more side pieces against the sides of the pipe and nail them down. That should be enough to hold that pipe in place while you punch a Forstner bit through it.

7/8" hole drilled completely through 1-1/2" PVC pipe As for the position of that topmost hole, I just measured down from the end of the pipe, taking into account the height of the end cap that would eventually be added. I put 2" between the bottom of the end cap and the top of the 7/8" hole. You can do whatever. I just thought this looked pretty OK.Drilling the rest of the holes is trickier to do. Since I decided to have four arms, or eight total places to hang towels. I wanted them rotated away from each other so eight towels would hang on this thing without hanging all over each other. Since we need to drill four holes total, we just need to rotate them 45º (360º ÷ 8) away from each other. To make it as close as possible to really 45º (i.e., "not eyeballing it"), I whipped up a quick paper template with markings every 45º around a 2" circle (here is the PDF you can print yourself and cut out). I cut it out and held it on the end of the MDF pipe-holder jig thing: 45º paper template for PVC pipe drill jig

To use the template, I just placed the pipe in the jig, lined up that first hole with the bottom (or 180º) mark and then rotated it counterclockwise to align it with the next 45º tick mark. Then, on top of the pipe, I took my ruler and marked an X 6" further down the pipe from the first hole. I did that two more times which gave me three markings, each 45º rotated from the previous mark and 6" down the pipe. I drilled out those holes and the idea worked great!Once I had all the holes drilled, I put the stem into the base to make working around it easier: PVC stem inserted into umbrella stand The ArmsIf you buy the pre-cut 24" long pieces of 1/2" schedule 40 PVC, you won't have to cut anything for the arms. I marked the 12" center of one of the arm pipes and slid it into one of the holes in the stem. I then traced the edged of the holes onto the arm and used that arm piece as a template for marking the other pieces. I used my small square to copy the markings onto the other arms

These marks help to get the arms centered in their holes in the stem. Pencil marks on PVC help to center arms in stem Find a drill bit that is slightly smaller than the screws you're using to hold the arms in place. PVC is soft enough that the screws will tap themselves into the plastic nicely. Later on, the paint will make sure the screws stay put even more so. That's my theory, anyway. I grabbed these drywall (I think) screws from my random screws pile I have a ton of those 1-inch-ish drywall (maybe?) screws in a drawer in my parts organizer. They have a nice grabby threading for the plastic pipe. So, I grabbed a slightly thinner bit and drilled holes through the side of the stem and into (but not through) the arm inside. I held arm tightly in place as I drilled. Hole slightly smaller than diameter of threading on screws I used For good measure, I used a countersink bit to make room for the head of the screw to be recessed into the stem a little. Small countersink bit makes easy work of recessing screw head into stem

Next, carefully screw in through the stem and wiggle the arm as the point of the screw come through inside so you can feel the hole in the arm line up. Tighten it down into the countersink hole. You could also tape or clamp the arm while you drill and screw. I was in a hurry because it was 110ºF outside, which equates to a "Feels Like" temperature of 1,000ºF in the garage. Here's the screw in place: PVC arm screwed in place through PVC stem I'm happy with the rotation of the arms relative to each other and the height and all. At this point, if 6' seems to tall to you, you can always cut more off the bottom. All the arms are in place PaintingThe primer is easy: Spray a couple of coats onto the plastic pipe. Follow the directions for the primer you buy.If you go the Rustoleum® hammered paint look like I did, this stuff can be screwed up, so follow the directions carefully. They tell you to put the piece to be painted on a horizontal surface. PVC towel tree laying on sawhorse, ready for painting